Showing posts with label orchid. Show all posts

Thursday, July 31, 2008

Plant ID: Epipactis sp.

Question:
Are there orchids that are native to growing in NY? I live in Buffalo and every summer have something growing in my yard that looks like an orchid. I will enclose a picture so maybe you can identify it.

Answer:
Actually there are a number of different kinds of terrestrial (meaning they grow in the ground) orchids that grow and can survive the winter here in the northeast. The orchid family, Orchidaceae, is one of the largest families, if not the largest, of flowering plants (also called angiosperms) in the world and they can be found on most continents. Some are native to North America while others have been introduced and then naturalized themselves in the landscape.

The plant you are trying to identify is in the genus Epipactis, and may very well be Epipactis helleborine, commonly called a broadleaf helleborine. I am always hesitant to swear 100% certainty as proper botanical identification can be much more of an involved process, but I am confident that we have your plant appropriately identified to genus. Helleborines are native to Europe and Asia but were introduced to the U.S. so long ago that these days they can be found in wooded areas and landscapes from Kentucky to Quebec and as far west as California and Oregon. Fabulous picture by the way – thanks for sharing!

Tuesday, April 22, 2008

Where to Prune my 'Gold Rush' Orchid?

Above is a photograph of my Epicattleya 'Gold Rush' at home in Astoria, Queens, and below is a helpful diagram of an orchid with a sympodial growth habit which I found at howthingswork.com

This is a piece about an Epicattleya orchid. Different orchids have different growth habits and different requirements as to where and when they should be pruned post-flower. This post is specific to Cattleya orchids and their hybrids and should not be used as a general guideline for all orchids. It is important to properly identify and understand how your orchid grows and flowers before initiating any pruning.

Question:
I was given a Gold Rush orchid when it was in bloom. It finished blooming, and I was uncertain how to prune back the spent flower spike. I was told by a friend that I should just prune off the spent flower cluster, leaving the bare spike. The spike has continued to stay green, but the orchid is not creating any new flower spikes or new buds on the existing flower spike stem. I'm not even sure when it should start blooming. I received the orchid at the end of June. Should I have pruned the flower spike stem all the way down to the leaf joint, or was my friend right suggesting to leave the flower spike stem on the orchid? When should my Gold Rush Bloom?

Answer:
Let’s first clarify what you are looking at. Your orchid should have tall pseudobulbs which look like fat green stems covered by a thin, papery cover. For my Gold Rush, each pseudobulb is 4-6 inches tall, and has a single large leaf at the top of it. After many months of having the plant, it grew a couple new pseudobulbs, again, with a papery cover and one large leaf. Then a little growth, referred to as the “sheath”, which looked similar a narrow upright leaf grew straight out of the top of the pseudobulb. This was the bud that the flower spike eventually emerged from, even though I admit it was many, many months before the flower spike finally emerged and blossomed. So, then I had a full flower spike that emerged from that narrow sheath. When the flower is past, what I will do, and what I would recommend, is to cut off the flower spike and sheath from the main plant right above where the large leaf is on each pseudobulb. Then, of course, what you will then be left with is each original pseudobulb and its single large leaf. To answer your other question, a new flower spike will not emerge from the pseudobulbs that have already flowered. You will water and fertilize regularly and wait for the plant to put up 2-3 new pseudobulbs, and those will produce next years flower. As far as when the plant will re-flower, I can not definitely say. The Gold Rush that I bought was advertised as blooming in either spring for fall and it bloomed right in the middle of winter. I received it in early March, I assume just past flower, and it was a solid year before I got to see flowers myself. As I said earlier, the protective bud sheath around the new flower spike was there for many months before finally opening.

Wednesday, March 19, 2008

Question Regarding Orchid Fertilizers

(A full year after I bought it, thanks to the right light conditions and regular fertilizing, this Laliocattleya 'Gold Rush' is in full bloom and knocking my socks off! Photo: Alex Feleppa)

Question:
While looking for orchid fertilizer retailers I cam across your blog. I hope you can help me with my problem. I wanted to know the names of stores that i could pick up the orchid fertilizers from in the Manhattan area. Could you also tell me the names of good fertilizers specifically for orchids?

Answer:
To answer your fertilizer question, my default destination for fertilizer and other supplies in Manhattan is Jamali Gardens at 149 West 28th Street. It is a small business but inside it is absolutely packed with every imaginable supply expect plants themselves. They always shift the fertilizers around so you might have to ask where they are, but the staff is usually very friendly and helpful.

As far as what fertilizer to use for your orchids, I typically use Schultz “Orchid Food”. It’s readily available and I’ve been using it for a number of years with good results. The N-P-K is 19-31-17 so you will be providing a good balance of nitrogen and potash with a little extra boost of phosphorous to help the orchid re-bloom. If you are not familiar with the N-P-K reading on a bottle of fertilizer a blog post from May 11, 2007, will help you understand that better. For this fertilizer all the nutrients are in water-soluble forms which becomes quickly available to the plant, so it is different from other kinds of fertilizers that might be more “slow-release”. As a result, and typical for orchids, I like to fertilize with a slightly diluted solution compared to what the bottle recommends and I fertilize every week. The catchy phrase I learned in horticulture school is “weakly weekly” when it comes to fertilizing orchids, and does keep the plants looking, growing, and blooming well. Come to think of it this product does give weekly and monthly dosage recommendations so they make it really easy on you.

As a final thought, some people love a product called Super Thrive. Super Thrive comes in very concentrated form and you have to follow the instructions carefully. The one thing I find that most people are not aware of is that Super Thrive is not a regular fertilizer. This product resembles a certain kind of plant hormone, or “plant growth regulator” as botanists would say, and it helps give plants a boost if they are struggling. Many people use Super Thrive as a fertilizer but I have been educated that Super Thrive can be used in addition to fertilizer, but should not be used in place of.


Friday, January 25, 2008

Using the HSNY Library

(The HSNY Library has a number of visual and written publications on a wide range of horticultural subject matter such as this illustration from Orchids from Curtis's Botanical Magazine, Edited by Samuel Sprunger)

Question:
I am a journalist writing a story on the orchids of the Yucatan for the AOS. I wonder if I can come down to the HS to use the library for my research. I am especially looking for Eric Hagsater's Orchids of Mexico or similiar volumes.

Answer:
Yes, you should absolutely come down to the HSNY Library and let us help you. A horticultural library with over 10,000 volumes open to the public M-F from 10-6, the HSNY Library is intended to be a resource for everyone here in the city. I can't say off the top of my head whether we have Eric Hagsater's book, but I am sure that Katherine Powis, HSNY librarian, will be more than happy to help find you references that will be of aid your research. Katherine is usually in from Monday to Thursday and I am usually in the office every day of the week. To borrow books you must be an HSNY member and we can discuss that in greater detail when you visit.

Monday, November 19, 2007

Plant ID: Paphiopedilum sp.


This is a kind of Paphiopedilum, an orchid commonly known as a slipper orchid. As members of the largest flowering plant family on earth, Orchidaceae, there are slipper orchids indigenous to both the Old World and the New World. New World slipper orchids, those native solely to the Americas, are known by the genus Phragmipedium. Cypripediums are slipper orchids that have been found in the Americas as well as Europe and Asia. Paphiopedilums are considered Old World slipper orchids and are native from India across southern China to the Philippines and New Guinea. Within the genus Paphiopedilum there are terrestrial species, which grow in leaf litter on the forest floor, lithophytic species, which grow anchored on limestone cliffs, and epiphytic species, which grow on other plants. The one above that I bought and added to my collection is an epiphytic species. You can tell this by the free-draining yet moisture retentive mix of fir bark that the plant is grown in, meant to resemble the environment in which they would naturally grow, in the crook of a tree perched high up in the rainforest. Many orchids have pseudobulbs which are large bulbous growths that retain and store excess water and nutrients for times of drought. Paphiopedilums, however, do not form pseudobulbs and instead do all of their water and nutrient storage in their thick, fleshy leaves. You can see that the slipper orchid I bought has an attractive mottling to its leaves. Paphiopedilums have been found at every elevation from sea level to 7,000 feet above sea level and higher, and those found in lower, warmer situations tend to have this characteristic leaf pattern. Now, certain orchid growers will tell you that both the solid-green and mottle-leafed Paphs can be grown with equal success, but since this is my first of this genus, and our city apartments can get so overheated, I thought I'd stick with one that I felt might adapt better to the environment I can provide. That and the mottled leaves will continue to provide some visual interest even after the flower has passed. This beautiful slipper orchid will prefer night temperatures a good 10 or 15 degrees cooler than the day, so I have placed it near a window where I hope it might get a chance to cool off a little bit at night. We cannot always provide the ideal conditions for plants we choose to grow as houseplants so we simply have to do the best we can. Otherwise I will provide it with general orchid care: water once a week in winter and perhaps more often in the summer when the plant is more active; keep a tray of moist pebbles underneath the pot to provide some additional humidity in the immediate area around the orchid; and continue to grow it in an area of bright, indirect light with no direct sunlight for any length of time. I bought this plant a month ago and the initial flower is still holding up very well. Remember, if you want your orchid flowers to hold up, you must provide the plant with some extra added humidity. There is a second bloom on the flower spike, another reason I chose this specific specimen, and after a month that is just beginning to open. Lastly, there was one final reason I chose to buy a Paphiopedilum and I will share that with you as well. Orchids have a growth habit that is either monopodial, or sympodial. An example of a monopodial orchid is a Phalaenopsis, or a moth orchid, that typical white orchid you see everywhere. Upon examining the plant you will see that all of its new growth emerges out of one single growing point at the top of the plant. Orchids with sympodial growth habits, on the other hand, put out new growth from the base or the sides of preexisting foliage. Look again at the foliage picture above. See the main growth where the flower stalk is rising up, and then see the new leaves growing up and out to the left of that? Well, that new growth will eventually grow into a plant of its own with its own flower spike. If it gets large enough I hope that some day I may be able to sever it from the mother plant and continue to grow on its own. In general I like to buy and grow orchids with sympodial growth habits (Paphiopedilum, Oncidium, Cattleya, etc.) because even when the plant is not in flower there is typically enough new growth of foliage that the plant is still large and interesting enough as a houseplant.

Tuesday, June 5, 2007

How to Care for a Macodes petola in New Jersey

Question:
I was recently given a Macodes petola and I do not know how to care for it. Can you please tell me this plant's proper light, fertilizer, and water requirements?

Answer:
Macodes petola, or jewel orchid, is a very unique member of the orchid family. I first saw one of these when I was a student at the NYBG and I could not believe my eyes. This orchid has dark green leaves with yellow venation that is truly a sight to behold. The yellow venation is so sparkly and bright you might think the plant looks like it is made of gold or is somehow illuminated! This is one such orchid that I would love to have in my collection not so much for the flower as much as the foliage.

As far as caring for your Macodes petola, they are particular but not impossible to keep alive. The first particular is that this orchid requires very high humidity. A bathroom with good airflow and indirect sun would be an appropriate setting. If that is not an option, place it near an open window where it can get some of the natural humidity from outside. If you are not doing so already, place some stones in your saucer to create a buffer so that excess water that collects in the saucer can evaporate and provide humidity without running the risk of rotting the roots. Do not allow the sphagnum moss that the orchid is planted in to dry out completely; it needs to be kept moist at all times. Regarding light requirements, be sure that your Macodes is never kept in a spot where it will get direct sunlight. Indirect sunlight is fine, but direct sun will burn the foliage in no time. The leaves look delicate and in fact they are much more sensitive than other more sturdy orchids (phalaenopsis, oncidiums, cattleyas,etc.) we typically see for sale. If you wish you can fertilize "weakly weekly" as you would your other orchids this time of year.

Thursday, May 17, 2007

Douglas Fir Bark for my Cymbidium Orchid


Question:
I am a recent owner of a large cymbidium orchid which someone decided they didn't want any longer. I found it on the street in a plastic bag. I've researched the internet and see that the potting mix for cymbidiums is Douglas Fir Bark (fine grade). Can you suggest any place in the New York City area where I can purchase a large bag of this medium? I'd like to avoid shipping charges which seem to be expensive.

Answer:
Congratulations on finding yourself that cymbidium. They can be a great plant. The only catch is that they will require some cooler temperatures come fall but we can revisit that later. Newer cultivars are being bred for better warmth tolerance. Your research and findings are correct. Most orchids we try to grow are epiphytic and need to be in a loose mix of either fir bark or sphagnum moss. Cymbidiums are more terrestrial, meaning they grow in the ground instead of in the crooks of trees, so you can use a fine grade fir bark mix. A few references I checked quickly even said that you can use a combination of fir bark and regular potting mix at a ratio of 50:50.

As to where to find it – are you familiar with the flower district down on 28th Street? Mostly between Broadway and 7th Avenues on 28th you will find a ton of different plant shops that sell everything from mixes to containers to cut flowers. A number of stores carry epiphytic mixes appropriate for orchids. You should be able to find the fine grade fir bark, but if shops only have a heavier grade (aka larger chips) then perhaps think about making the 50/50 mix I mentioned above.

Otherwise: bright light to dappled sun; water once a week. If you can keep it near an open window where it will get cooler at night that is a help too. When planting do not bury the pseudobulbs (the large tuberous stems) too deeply. Enjoy!

Saturday, March 31, 2007

Repotting your orchids in spring

This weekend I repotted a few new orchids and I thought I would show you how I did it. They were a couple of mature orchids, two Cattleya hybrids and a Brassavola hybrid, not yet in flower. I did also buy a Doritaenopsis hybrid in flower, but I will hold off on repotting that until after it has flowered. I do not want to shock the plant while it is putting out such a tremendous flower, not to mention I do not want to run the risk of accidentally breaking off any buds. For the others, however, I know that spring is a good time for them to be repotted, and I could tell that they were pretty packed into the plastic pots in which I received them. In general, repotting newly purchased plants is a good idea because then you can be sure that they are well situated in the appropriate mix in their new home. Here is a quick guide to repotting your new orchid(s).

The supplies you will need are: your new orchid, additional long fibered sphagnum moss or epiphytic bark mixture (depending on what your orchid is being raised in now), a container with good drainage the same size or 1” larger than the plastic growers pot you bought it in, a slightly oversized saucer, a bag of small pebbles or decorative gravel, and an ample work space with a faucet where you can make a decent mess. You will be using room temperature water (70-72°) and plenty of paper towel. Here you can see I set up shop in my kitchen sink with some extra space cleaned off on the counter.

Step one: Prepping your work area. Place your sphagnum moss in a container or colander and soak it thoroughly. Submerge and soak your terra cotta pot for a few minutes to make sure it is clean and saturated as well.

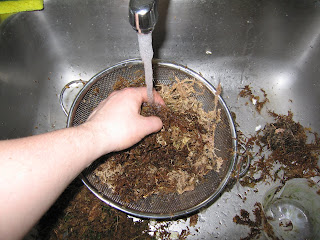
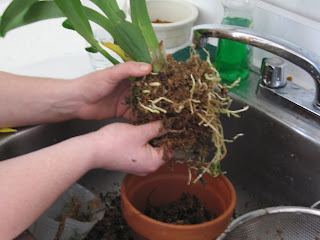
Step two: Cleaning and teasing your orchid. This is the part that makes most amateur growers most worried, but don’t be. You are going to have to touch and handle the plant roots, and some may break off, but you must realize that in the long run you are going to be making your new orchids very happy for their new home. Cut and remove the plastic pot. Now carefully tease out and loosen as many roots as you can. If the roots seem dry, do not be afraid to run some water over them to help make them more limber. Epiphytic orchids, those that grow in or on other plants, have roots with an outer tissue called velamen. Velamen helps the roots retain more moisture for longer periods of time, as well as helping protect against the suns rays. Once wet they are much easier to move and bend. Take your time to really tease out as many roots as you can, removing deteriorated moss, dead roots, and styrofoam. Remember that roots prefer to grow out and down, not necessarily in circles bound in a crowded plastic container.


Step three: Potting up. Go ahead and place a handful of moss in the bottom of your soaked, clean terra cotta pot. Squeeze the moss with your hands so that it is moist, but not soaking wet. Take another handful and work it in underneath the plant where you removed old moss, Styrofoam, etc. Like with terrestrial plantings you want to avoid leaving large air pockets in the container when you are done. With some moss in the pot and some cupped underneath your orchid, place the plant in the terra cotta pot. Push the roots down deep into the pot and begin to fill in with additional moist moss. Again, do not be afraid if it takes a little force to pack in all the roots and moss so that they are tight in the pot. An orchid expert and good friend of mine also passed on the tip once of twisting the plant as you place it in the pot. This helps you get the roots down deep into the container to properly anchor the plant in the sphagnum moss. Continue to fill in with extra moss until the orchid seems pretty well anchored in the pot. Use enough moss that the plant is clearly secured in the pot but do not pile the moss higher than where the foliage and/or pseudobulbs begin to push out root tissue. Once you have properly repotted your orchid you should actually be able to slowly pick up the plant and have the pot come up with it. If you pull on the orchid and it comes right out then you need to secure it better in the terra cotta pot.


Step four: Situating your newly planted orchid. Take your gravel or pebbles and place a layer of them in your slightly oversized saucer. What this does is create a buffer zone between the bottom of the saucer and the pot where the plant’s roots are. With this buffer, the extra water that seeps through when you water your orchids collects in the saucer. The excess water is not in direct contact with the roots, so you do not run the risk of rotting your roots, yet the water in the saucer slowly evaporates and provide much needed extra humidity to your orchid. Especially now while our apartments and homes are still closed up because it’s not warm enough outside, it is crucial to do all you can to provide your orchids with some level of humidity. Lastly, place your orchid in a location where it is going to get ample sunlight for that particular species, decent air circulation, and again, as much humidity as possible. If you place your orchids in a bathroom with enough light remember that even though the humidity will be great, you may also have to figure out creating additional air flow and circulation if there is no window or fan to have on or open.


From here, water and fertilize lightly and regularly, occasionally mist your plants if the species can handle it, and enjoy.